Knitting, crafting, cooking, and motherhood… trying to do it all!

The Child for All Seasons MKAL is in full swing on Ravelry! It’s never too late to join, and you can even preview the Autumn Collection before buying. Purchasing the year gets you 12 children’s patterns for one low price, released seasonally throughout the year.

This season, I have designed two of the patterns: the Trail Mix Fingerless Mitts and the Twisted Trails Hooded Sweater. Both are perfect fall knits for the little ones in your life!

TwistedTrails

IMG_7644 (2)

Having already knit 4 versions of the Twisted Trails, I decided to make a version with a kangaroo pocket for my godson Michael. I had never knit a kangaroo pocket, so it was a bit of a learning experience. My whole goal was to have the cables travel uninterrupted up the front of the sweater. I achieved that goal and I’m so happy with the results! Although this is not a pattern or an addition to the pattern, any adventurous knitter can use my notes to modify the pattern on their own. If you have questions, jump in on the MKAL forums and I’d be happy to answer them!

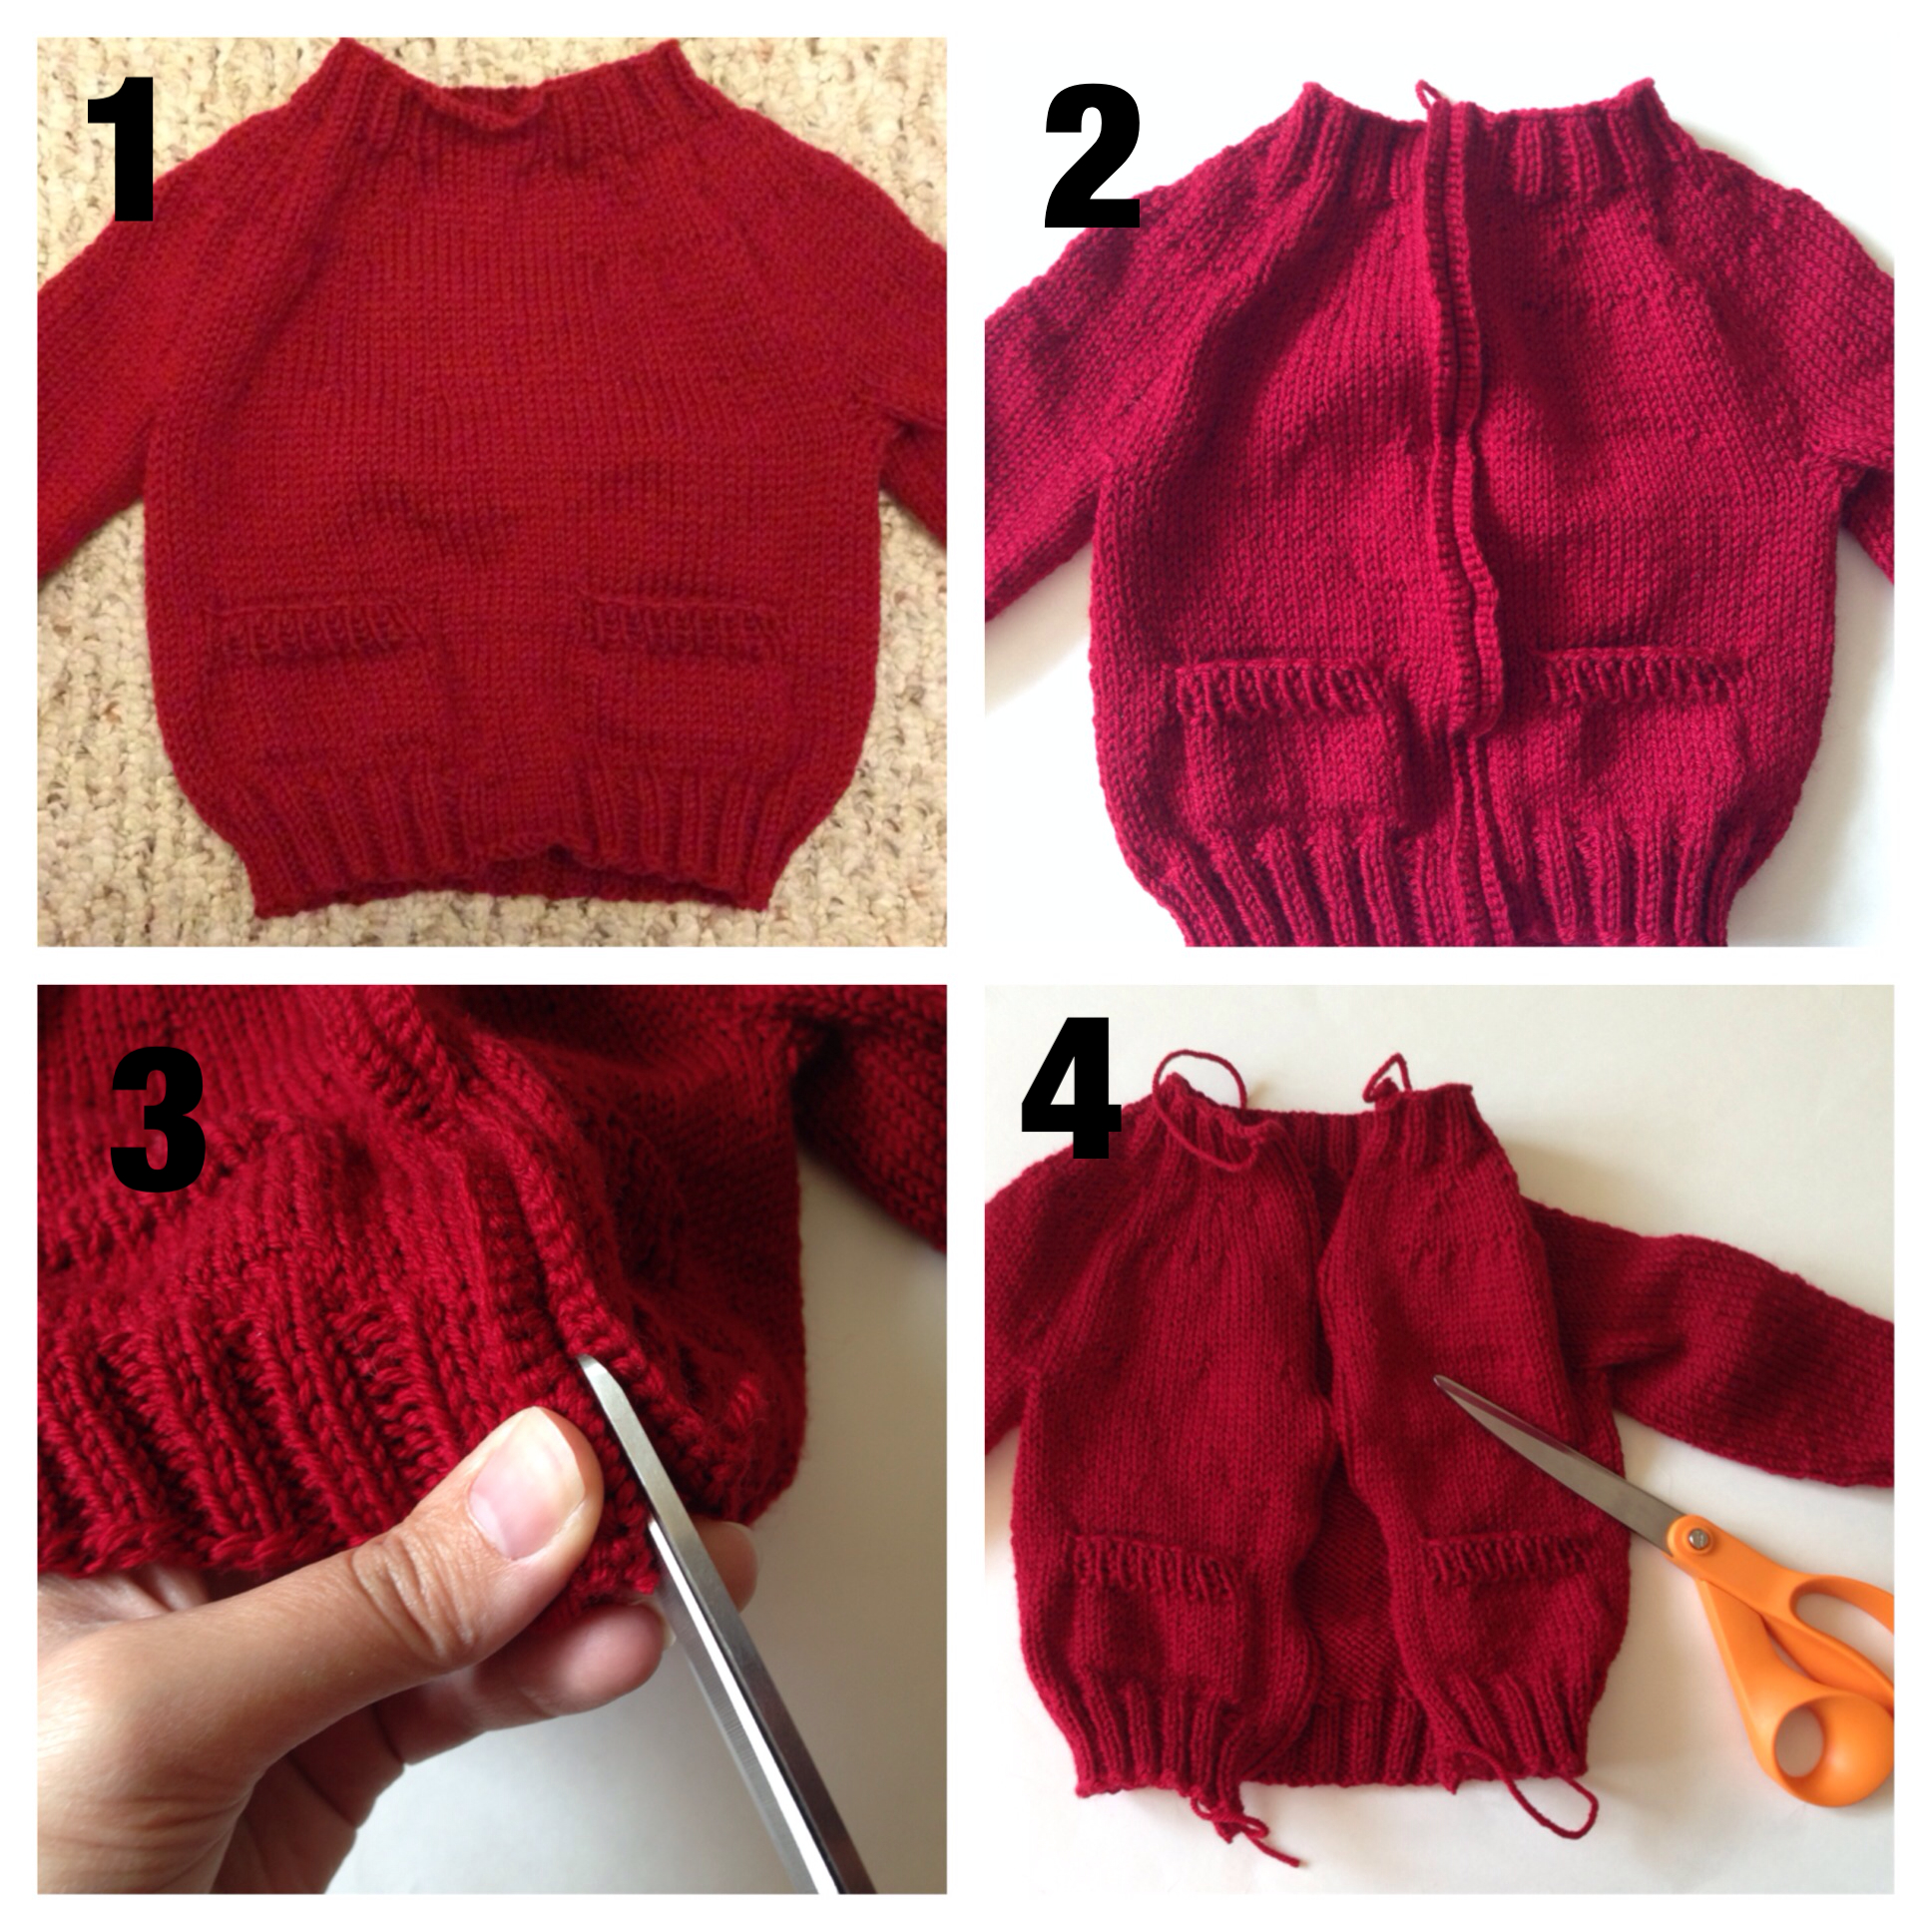
1. I began by knitting a rectangle the size that I wanted the inner pocket to be. I used a hoodie belonging to my older son as a guideline and chose to make mine approximately 8″ x 6″. I began with a provisional cast on (onto a spare needle). I also added the bright orange yarn as a lifeline since this was a technique I had not yet tried.

IMG_9392

2. Next I began the ribbing according to the pattern. On the first row of the main color, I knit all the stitches without beginning the cable chart set-up. Instead, when I came to the stitches that would center my pocket along the front, I lined up the needles WS together and worked k2tog with one stitch from each needle.

IMG_9402

IMG_9403

IMG_9416

3. After attaching the pocket to the ribbing, I worked the pattern as stated for approximately 1 inch to create some bottom depth for the pattern. At that point, I began working each section flat– the section that was the width of my pocket (including the cable chart) and the section that did not include the pocket. When I reached the length of the pocket, I was ready to join them together. I joined them the same way as before, lining up the needles and working k2tog or p2tog as needed. The difference was that this time I also had to cable as I was working the stitches!

IMG_9445

IMG_9448

IMG_9451

4. Once the sweater was finished, I used mattress stitch to seam the side of the sweater with the pocket rectangle, leaving the opening for the hands.

IMG_9505

5. Using the contrasting color (gray) and smaller needles, I picked up and knit 24 sts (a multiple of 4). I worked the same ribbing pattern as indicated for the hood ribbing. Using mattress stitch, I attached the sides to the sweater.

IMG_9510

IMG_9520

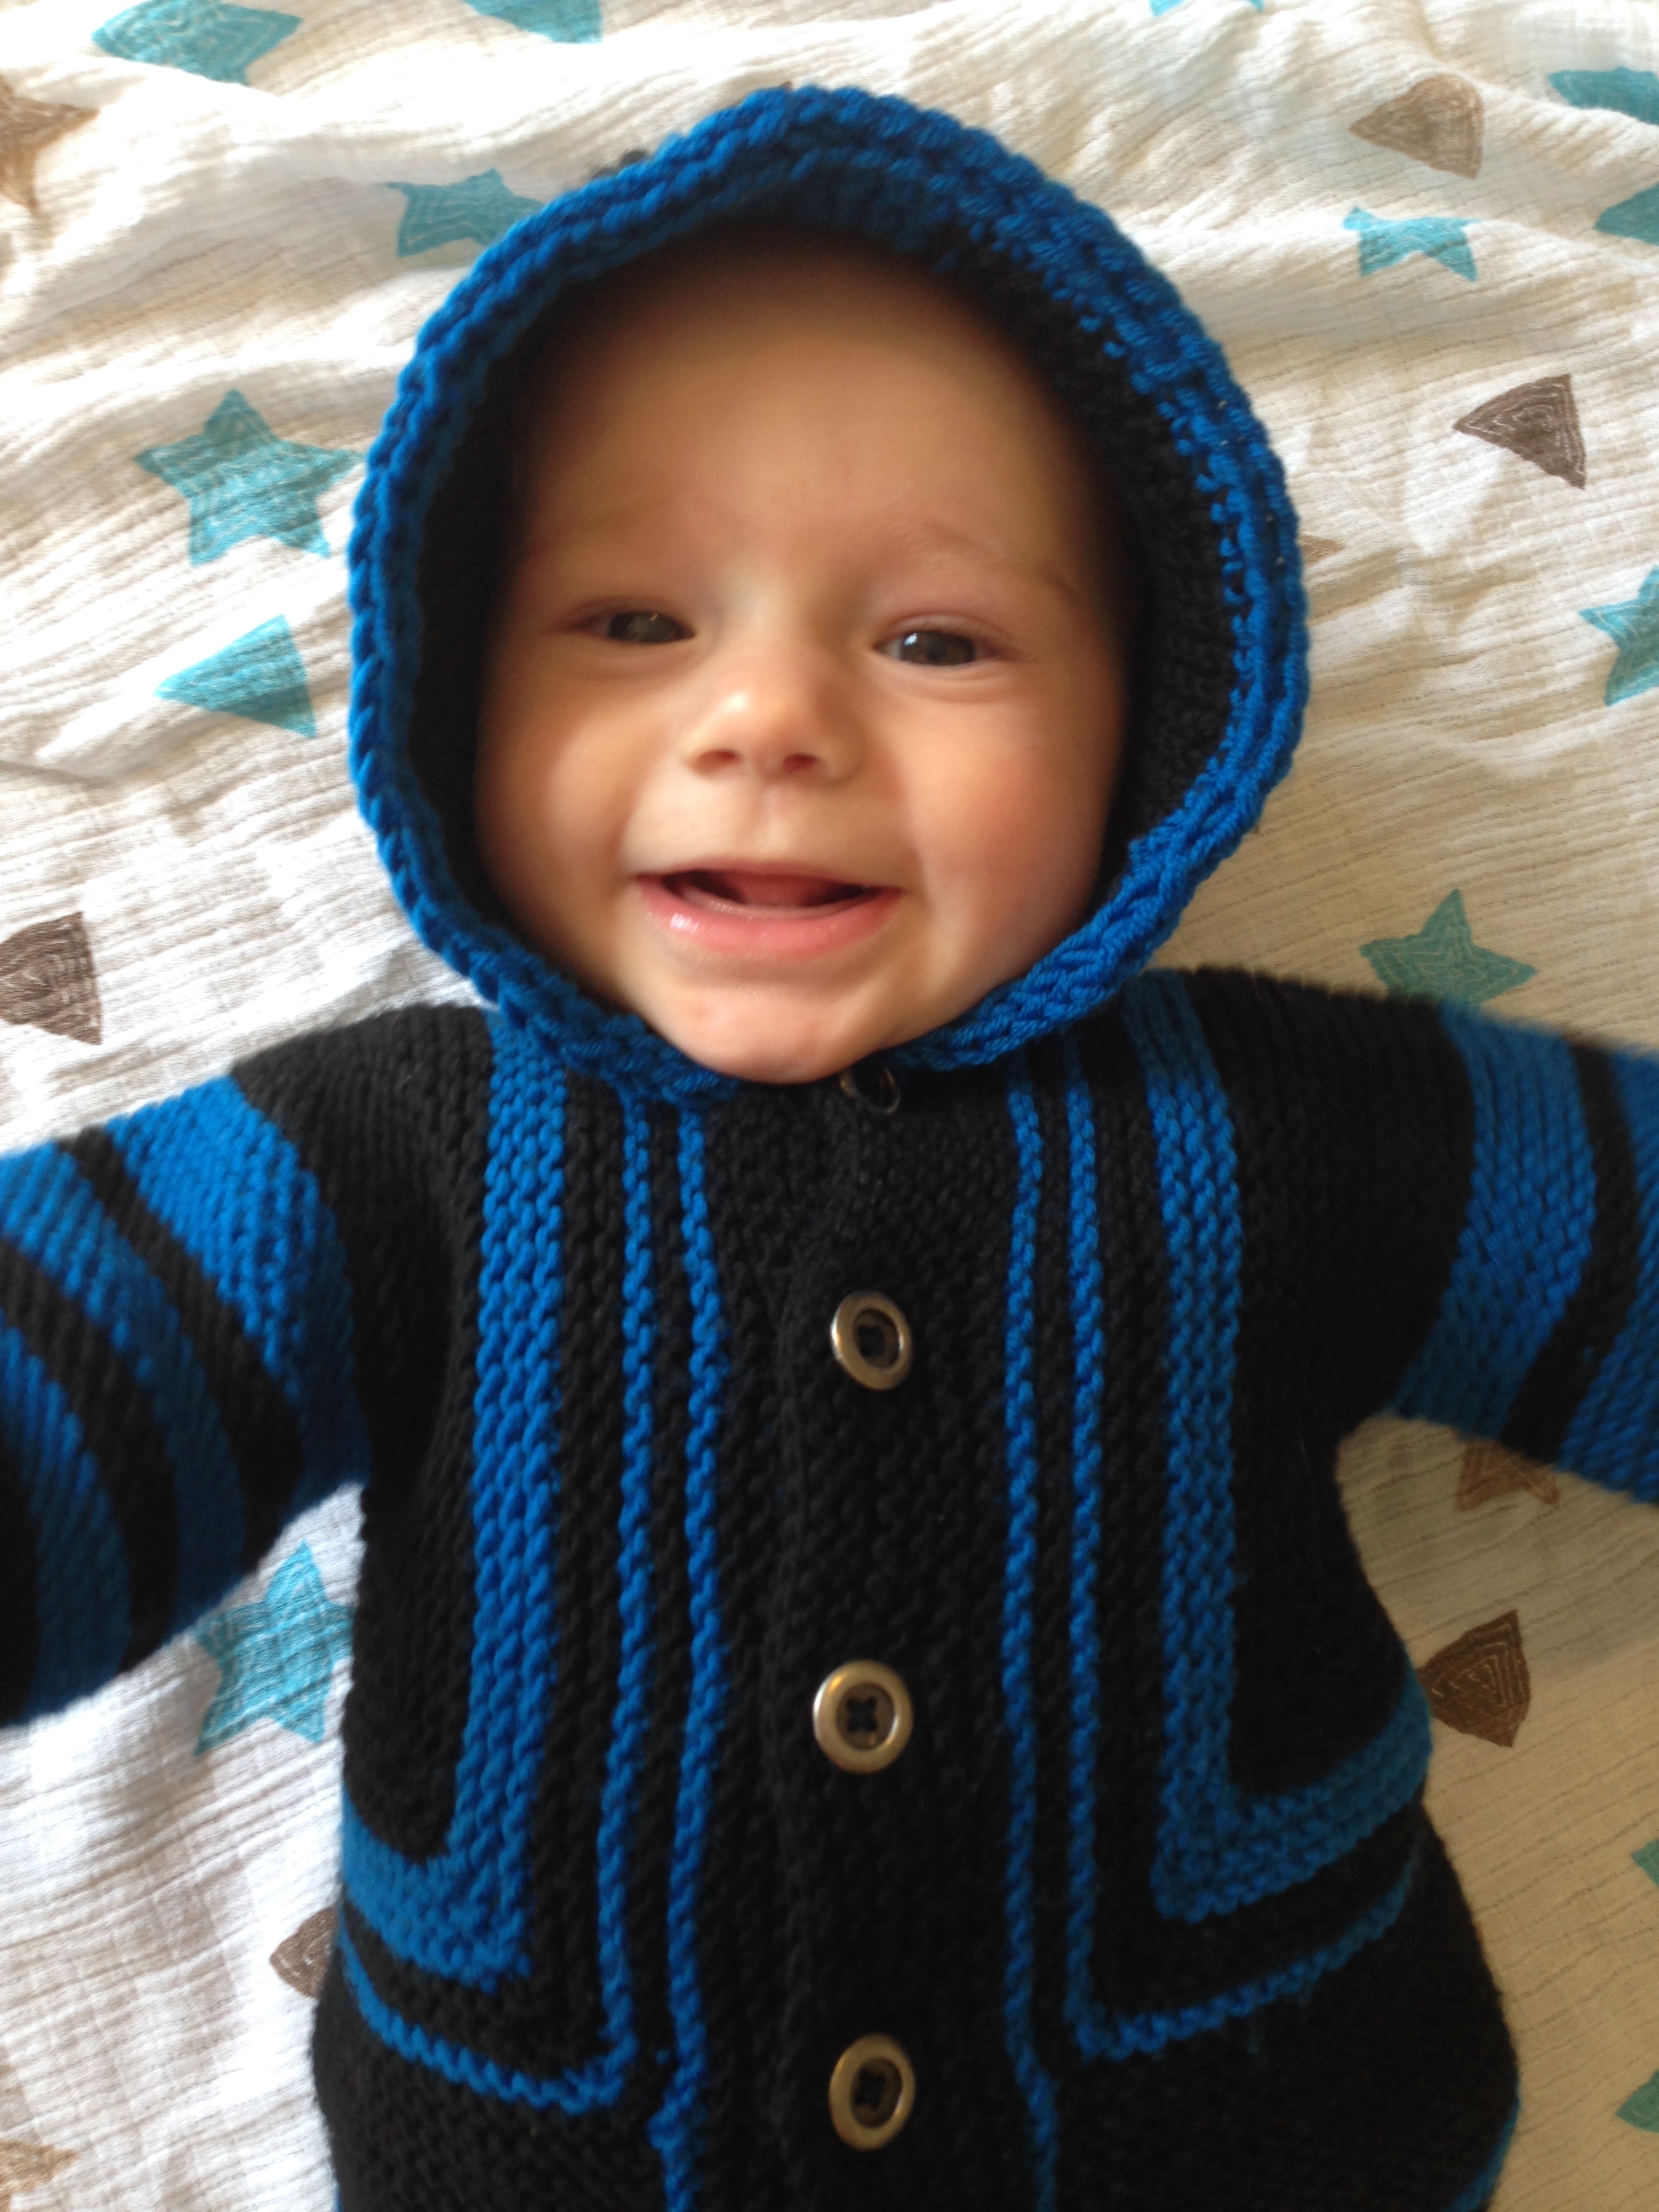
6. The result was a beautiful new hoodie for my nephew’s birthday, shown here modeled by my son Adrian. I am sure this will get plenty of use all season long!

IMG_9557   IMG_9563

I hope this is helpful to anyone wanting to add kangaroo pockets to their handknits. And if you haven’t already, join us as we knit our way through the year in the Child for All Seasons MKAL!

The Season for Sweaters

In 2014, I knit fifteen sweaters. FIFTEEN. Only one of those sweaters was adult-sized, but fifteen sweaters is no small feat. Not to mention I also knit 9 vests, 11 hats, 1 cowl, 4 pairs of mitts, 1 pair of baby leggings, 4 pairs of socks, 3 bows, and countless swatches and project beginnings. It’s been a busy year for knitting!

I thought I’d take some time to show off some of those sweaters that have not yet been featured on my blog. I’d like to start by raving about the ladies of Tin Can Knits. Alexa and Emily are the masterminds behind the Tin Can Knits design team. They are amazing women who, despite each having a baby last year (just like me!), released a new book of knitting patterns entitled Road Trip. Their designs are a wonderful blend of modern and classic, with easy-to-follow instructions and clear guidelines for any knitter. As if that isn’t enough they also have a blog to help knitters through new and/or troublesome techniques. The greatest thing about TCK, though, is that most of their patterns are sized baby through adult. I got to try many of their patterns for my four boys and I never had to worry if they had the size I needed. I’m going to begin detailing my Season of Sweaters by showing off some of my favorite Tin Can Knits designs.

The first sweater I knit was Caribou from TCK’s Road Trip. The recommended yarn was Brooklyn Tweed Shelter. I had been interested to try this yarn, so I invested in some ‘Almanac’ colorway for a toddler sweater. I was excited to try this pattern because of its unique construction. You actually knit the cable band first, then pick up stitches to knit the top and the bottom. The button band ribbing lines up perfectly with the cables, so they seem to extend to the edge. Knit in the beautiful (and incredibly lightweight) Brooklyn Tweed Shelter, this sweater turned out to be incredibly adorable. I chose the 2-4 yr size, which turned out to be much too large for my 2 year old, but the sleeves cuffed nicely and it will last for one or two years to come (just in time for his baby brother to grow into it!).

IMG_4474 IMG_4482

While I loved the Caribou sweater, I wanted something a little dressier for Jonathan to wear for Christmas. I chose TCK’s Prairie Fire sweater. This sweater uses lacework to create a design that comes to a point on the front, then wraps around the sweater to meet in the back. It’s such a clever design. Even though this sweater was modeled on girls, I decided my little guy was “man enough” to pull off lace. I couldn’t be happier with the results. Knit in the 1-2yrs size, this was a perfect fit for Christmas. It goes well with a turtleneck or polo shirt underneath and I can’t get over how handsome he is (I know, I’m a little partial).IMG_7753

I wrote in a previous post about knitting a baby cardigan using TCK’s Clayoquot without the colorwork. I decided to knit this sweater with the colorwork in the 0-6mos size for a dear friend who just had a baby. The Clayoquot pattern is a great pattern for anyone new to stranded knitting. I loved knitting this girly little sweater (I never get to use pink!) and I can’t wait to see it on Baby Elise!

IMG_5335

One more TCK pattern: the Antler Cardigan. After knitting all the sweaters I liked from Road Trip, I invested in TCK’s older book, Pacific Knits. This book includes lots of great patterns, but I bought it specifically to knit the Antler Cardigan. I chose the colorway Peacock Shadow from Dream in Color, mostly because my son Roman said he liked turquoise. The color ended up looking a lot more navy than turquoise, but I love the way the tonal yarn looks in this simple pattern. Knit with size 9 needles, I flew through this pattern for my eight-year old. Roman wore a white polo shirt underneath for Christmas Eve Mass.

IMG_5115 IMG_5096


Those are all of the TCK sweaters, although you can find quite a few of their hat designs in my previous post. The next sweater I need to feature is a classic design by Elizabeth Zimmermann: the Baby Surprise Jacket. Elizabeth Zimmermann, known to many as the mother of modern knitting, created this incredibly clever design and it is still one of the most knit baby patterns today. It is knit flat, then folded origami-style and seamed to create a darling baby jacket. I highly recommend this design for every knitter to try. The construction is truly one-of-a-kind. In my version I used Plymouth Select Worsted Merino Superwash. I added length to the sleeves and added a hood, using i-cord around the edges of the hood and cuffs.

IMG_3830IMG_3832IMG_4265


In an effort to learn how to knit a set-in sleeve, I chose the pattern Arlo from the BT Kids collection. This is an amazing sweater, but it was WAY more work than the seamless knits previously listed. This sweater was knit in five pieces, seamed together, then had a shawl collar picked up and knit with short rows. I learned SO much from knitting this sweater, but I also spent a lot of time watching YouTube videos to learn some of the new techniques. The results are fantastic, though I do regret not using Brooklyn Tweed Shelter to knit this design. I love seeing my six-year old Adrian wearing this sweater around town.

IMG_4156 IMG_4162 IMG_4173IMG_4198IMG_4194


So, there is a sampling of some of my favorite designs from 2014. My absolute favorites cannot be revealed just yet… they are of my own design and will remain a mystery for a few more months. 2015 holds many more sweaters in store. I’ve already finished two (one of them a massive sweater for me) and February is just getting started!

Hats! Hats! Hats!

One of the greatest things about cold weather (one of the ONLY great things about cold weather) is the chance to wear the things you’ve been knitting all year. Although my boys have some hats I crocheted for them years ago, I figured they needed to upgrade to some knit hats and it gave me a chance to learn more about hat construction. Thus became my mission… to knit hats for the family!

At the end of October I had knit plenty of things for my kids, but hadn’t made much for me. I had bought some Brooklyn Tweed Shelter (colorway ‘Thistle’) to knit Jared Flood’s Laurel hat. I thought, “It’s small, I should be able to finish in a night.” Ha! The pattern is lovely and the chart was easy to read, but I wasn’t as quick as I dreamed I was. I finished in about three days, but long hours were put in during that time. It was a great learning experience, but I kept making small mistakes and needed to tink back or ladder down to fix the problems. In the end, the result was beautiful. I love my new hat and I love that I took the time to make something for myself!

IMG_4696[1]IMG_4701

As the cold winds of December blew in, I started working on a hat for my baby. I wanted to try knitting Tin Can Knits’ Clayoquot cardigan with colorwork (I had knit this pattern without the colorwork here), but I thought I would start with the Clayoquot Toque. I knit this one in less than a day. It’s super cute, but I do wish it was just a bit larger. I try to make things to last more than a couple months, but with growing boys that’s tough to do! This hat looks nice and is quite durable knit in Cascade 220 Superwash.

IMG_5129 IMG_5126

Moving on, I wanted to try out a pattern from the Tin Can Knits book Pacific Knits, which I had recently received. I used some lovely Dream in Color Classy yarn (colorway ‘Peacock Shadow’). The pattern is Sitka Spruce, and uses twisted stitches to create an awesome geometric pattern. This one was not for my boys, though. This one was a gift for a special friend who has recently moved to a much colder place. I figured the warm wool would be perfect for those snowy days in Buffalo, NY. This one also turned out a little shorter than I wanted, but after blocking it was closer to the correct size. The tonal yarn looks amazing with all those twisted stitches!

IMG_5122

Three days before celebrating Christmas, I decided to make a hat for my husband using more Brooklyn Tweed Shelter (colorway ‘Birdbook’). I chose Apple Pie— another TCK pattern. This one features a ribbed doubled brim. Although it was tedious to knit the extra length of the doubled brim, I think it will be super warm. All the cabling within this hat took a long time, but I love the results. I love how it looks on me, so it was almost a disappointment when my husband loved it and wanted to wear it! (Ha! Just kidding!) That doubled brim was a foreshadowing of a future project… a project that made the hat brim seem like nothing at all (more details to come!).  Here is the hat modeled by Yours Truly.

IMG_5172

Next up was a hat for my second son, Adrian. I decided to do yet another TCK pattern (I own two of their books, of course I’m going to knit their patterns!)– Stovetop. This uses moss stitch to create an interesting texture and some simple cables along a main panel. The crowning glory, in my opinion, is the pompom on top. I knit this one with some leftover Plymouth Worsted Merino Superwash (colorway ‘Primavera’) and I am SO happy with how it turned out. Although it was created for Adrian, my third son Jonathan has adopted it as his own and looks incredibly cute in it. Here it is modeled on Adrian:

IMG_8101

Dying to try more simple colorwork, I found The Easy Ombre Slouch Hat, by Paul S. Neary, a free pattern on Ravelry. I changed the pattern quite a bit (detailed on my project page), but it was exactly what I was looking for. I used the same Plymouth Merino Superwash used in Adrian’s hat, paired with some blue yarn of the same brand. This design also inspired me to design a sweater with a similar effect. I loved the results, but my oldest son Roman has been crocheting hats for himself, so this one doesn’t get much use.

IMG_8093IMG_8098

One final hat to add to the post… another one that was intended for me! Although the Laurel hat I made at the beginning of this post is great for cooler weather, I wanted one that could withstand heavy snows (not that we’ve had any this year). I used, you guessed it, a TCK pattern. This one is called Tofino Surfer and is from their book Pacific Knits. I had some trouble finding yarn to get the recommended gauge. I settled on some Cascade 128 and used a size 9 needle. The hat turned out great with one exception. Because I used a smaller needle size, the tighter stitches caused it to stick up straight instead of slouching. As I blocked it I stretched the wool, which helped a lot, although it does require a little push to make it slouch. No modeled pic for this one:

IMG_7982

What are your favorite hat patterns? The cold weather isn’t through yet… I could always knit another!

STEEKING. It means that you will be cutting stitches that you just spent hours (if not days) knitting. Crazy, right? I had never heard of steeking until I started knitting in January. While watching an instructional video on YouTube, it recommended a steeking video. Curious as to what it was, I watched in amazement as a carefully knit sweater was cut straight down the middle. From that point on, I was fascinated by the concept but did not take the opportunity to try it myself until this month.

Why would you cut your knitting? Steeking was developed by knitters of the Shetland archipelago and is particularly associated with Fair Isle knitting. The idea is that you can knit a cardigan sweater with frequent color changes and never have to turn your work to the back where all the colors are being carried. You essentially knit a tube in the round and make cuts for the front of the sweater and/or arm holes. If you use a particularly sticky wool and change colors correctly, you can cut your sweater without any extra reinforcement. If you are using a fiber that has been processed (such as a superwash), you will need to reinforce your stitches with a line of single crochet or with a sewing machine. After the sweater has been cut, the knitter can pick up stitches down the middle to create a button band to finish the garment.

I have read a lot about steeking and have watched several instructional videos. Elizabeth Zimmermann used steeking quite a bit and describes the process throughout her books. Intrigued, I was determined to try it myself. About a month ago, I received a digital download of the Tin Can Knits book Road Trip, which featured a steeked sweater. After knitting their Caribou sweater pattern (as I mentioned in my post about cables), I decided to try their Clayoquot pattern and experience steeking first-hand.

Clayoquot is a lovely sweater, featuring a Fair Isle design that I really love. I had previously purchased some Cascade 220 Superwash in “Ruby” to make a sweater for my two year old son, Jonathan. Since I had just knit the Caribou sweater for him, I decided to knit Clayoquot in the 6-12 mo size for my baby boy, Christian. I looked at all different colors to use for the Fair Isle patterning, perused project pages of other knitters, and finally decided that I didn’t want to knit with multiple colors. I wanted a simple red sweater. Now, I realize that the beauty of their design is in the patterning, but I wanted a versatile sweater that could go with everything. I loved that the pattern included pockets (my first time knitting them) and I would get the chance to try steeking with a sweater I could knit in just a couple days. I also feel that to become adept at stranded knitting, I need to teach myself how to “flick” the yarn with my right hand so I can knit a color in each hand. While it is on my list of things to learn, I’m still trying to improve my speed with Continental knitting.

If you are trying steeking for the first time (and every knitter SHOULD), I highly recommend reading up on it first. The lovely ladies of Tin Can Knits have an excellent blog post which I read repeatedly before making the first cut (and you get to see pics of a super cute baby!).

Here is a brief shot of my steeking experience: 1. Sweater knit in the round with the middle five stitches prepped for steeking. 2. Two lines of single crochets down the front to protect the stitches. 3. Cut down the middle of the stitches. 4. Steeking is complete.

photo (4)

Add a button band and some buttons and, voila!

IMG_7246

Christian has a sweet little sweater now and it took just a couple of days. I’m glad I started with something so small, but I now have the confidence to steek in the future. It no longer intimidates me and I love that I can knit it all in stockinette with very little purling. And now a few pics of my own cutie in his newest sweater:

 IMG_7248 IMG_7263 IMG_7264 IMG_7272 IMG_7279 IMG_7281

Cables are the Best!

Since my last post, I have been crazy busy designing knitwear. I now have four patterns for sale on Ravelry, two in testing, two to write/photograph… and about a hundred more ideas swimming around in my head. I love seeing other people knit my designs and I have gotten so many compliments on the clarity and quality of my patterns.

For the past several months, I have been having a love-affair with cable knitting. I learned how to do a basic cable on day 3 of learning to knit. It was a technique that I had never encountered with all my years of crocheting and I was so excited to try it! Since then, I’ve been studying and swatching TONS of cable patterns. I’ve been studying their construction and the layout of the charts. I’ve now moved on to creating my own! I found a lot of great cable ideas in this book by Melissa Leapman:

knitstitch

I absolutely love argyle, so my first order of business designing my own cable was to attempt to cable argyle! I tried MANY different ways of doing it, but there was only one that I really loved. I used this as the basis for creating a cardigan vest for Michael, my godson and nephew. He told me his favorite color is, “toy-quoise,” so that is the color he got!

IMG_5284

You can see from the picture that this uses a thick cable for the main diamonds, and a thinner cable (created with twisted stitches) in the background. The front of the vest features cabled diamonds along the front panels. the edging is all done in rice stitch. Be sure to check out my Diamondback Cardigan Sweater Vest on Ravelry!

IMG_5285 (2)IMG_5293 (2)

Michael loved his new vest and it seems to be a hit with my customers as well!

This fall I tried two cabled cardigans that were not my own design. I created Arlo, by Brooklyn Tweed, and Caribou, by Tin Can Knits. I loved both of these patterns! Arlo begins with a tubular cast-on (my new favorite cast-on!) which make the stitches look like they wrap over the edges of the sweater. It was knit in five pieces, so I got lots of practice with seaming and my first experience with a set-in sleeve. I am SO happy with how it turned out!

photo 1 (1)photo 2 (2)

Caribou, by Tin Can Knits, was another fun knit. This one had such unusual construction that I had to try it! The cable band is knit first, then you pick up stitches above and below to create the rest of the sweater. My favorite part is how the cables appear to run straight onto the button bands! I knit this one using GORGEOUS Brooklyn Tweed Shelter Yarn and I can’t wait to use their yarn again! I’m going to have some very warm boys this fall!

photo 1 (3)photo 2 (1)

My favorite cable project was my own. Roman, my oldest son, requested that I design a sweater for him in honor of his eight birthday. I let him choose from the color palette of the Plymouth Worsted Merino Superwash and he chose the color “Primavera.” I wanted to play on the X’s and O’s without being too obvious about it. I swatched and swatched for months (here and there) before settling on a Double X pattern on the back with seed stitches in the middle and a chain link “O” pattern running the length of the sleeves. This is one of the patterns that is finished, but needs to be photographed and written (hopefully soon!). Roman is LOVING his special sweater!

photo 1 (2) photo 2 (3) photo 3 (1)

Be on the lookout for new cable patterns to come from me! My boys can’t rock the lace, but they look awesome in cables! I just can’t wait to do more 🙂

Crocheting with Boys

My oldest son Roman will be 8 in August.  From the time he was three, he has particularly loved drawing, creating, and crafting.  We used to have “Mommy/Roman Work Time” while his brother Adrian was down for a nap.  We would work in my craft room on various projects.  I was typically designing handmade cards for my side business, while he would use paper scraps to design all sorts of creations.  As Adrian got older, he joined in the fun.

IMG_3398

This past year, both boys received a Rainbow Loom for St. Nicholas Day.  The boys have gone wild watching YouTube videos and learning how to make everything from bracelets, to charms, to animals, and even a mini-bag out of the colored bands!  Roman has become particularly adept and has taken to creating his own loom designs. His animal project for school was completed with a diorama featuring Rainbow Loom raccoons.

IMG_3067

When I was pregnant with my third son back in 2012, I started crocheting quite a bit.  I ended up making three baby blankets and a variety of hats, booties, etc. for the new baby.  Roman and Adrian took quite an interest and loved to sit and watch me work.  They asked me to teach them, but I felt they were still a little young.

This past year, I was pregnant with my fourth boy.  In January, I taught myself to knit.  Once again, my older boys took an interest and asked me to teach them to knit.  I laughed, saying that I was just learning myself.  I did tell them, however, that I would teach them to crochet.  With more than 20 years of crocheting experience and having taught a number of people how to crochet, I felt that they were ready.

Traditionally, knit and crochet are thought of as a feminine activity.  There are plenty of men out there who do one or both, but they are in the minority.  I don’t have any daughters and with four kids already, I don’t plan to have one.  Instead, I was blessed with four amazing boys.  If my boys are interested in learning a skill that will improve their fine-motor abilities, then I am not going to hesitate to teach them!  Maybe they will lose interest as they get older, or maybe one of their friends will tell them it’s too “girly,” but I can say for certain that I am not going to be the one to pigeonhole my boys.

About a month and a half ago, I sat down and showed both Roman and Adrian how to make a chain stitch.  Adrian was content with that knowledge and didn’t feel the need to go any farther in his crochet lessons.  Roman, on the other hand, grew bored of the chain stitch very quickly and so we moved on to a granny square.  Having taught other children to crochet, I feel that a basic granny square is the best way to learn.  You do not have to go into individual stitches very often, which can be challenging to a beginner.  The double crochet, while being slightly trickier than a single crochet, is easier to identify among other stitches, even if it’s made tightly.  Most importantly, at the end of a short lesson, you’re left with a lacy square that actually looks like you accomplished something.

IMG_3042

Roman made his first granny square that night.  He didn’t pick up the hook and yarn again until last night, after purchasing some yarn and hooks from a friend’s yard sale.  To my surprise, he didn’t even need a refresher course, he started right up and made a granny square with minimal help.  His squares aren’t perfect, but he is improving his skill with each one.

After I put the two little ones to bed, I found Roman sitting in my bed working.  I sat down next to him and I knit while he crocheted.  We chatted together while we worked, just like old friends.  After a while, he asked, “Can we do this every night?”  I can’t even tell you how happy this made me.  My heart feels incredibly full to have a child that loves working with yarn as much as I do.

IMG_3391

This morning, both boys started crocheting the minute they got up and have worked on it throughout the day.  Adrian is becoming more comfortable holding the hook and yarn and is making a rather long “snake” out of a crochet chain. (It works out quite nicely that he has been obsessed with snakes for the past few months.)

IMG_3395

They may not want to crochet forever, and that’s totally fine with me.  For now, I’m enjoying sharing a skill that is so dear to my heart with two of the boys I love most in this world.

IMG_3397

In the pattern I just created, I called for the knitter to use “your favorite stretchy bind off.”  In the course of making four coordinating sweater vests, I tried a number of stretchy bind offs.  I looked through books, searched the internet, and watched YouTube videos to see what others recommended.  I tried a number of them, some of which made it only a few stitches before I ripped it out and started again.  Somewhere along the way, I found one that suited my needs quite nicely for this design.  It’s stretchier than a regular bind off, but not so much that it gets stretched out.  It has a nice even line with no extra flare (or flair!).  I have since gone back and tried to find the bind off online to find the name and give credit, but I have not had any luck.  So, I’m going to name this the Twisted Stitch Stretchy bind off, as each stitch is twisted by being worked through the back loop.  Here it is!

IMG_3371


Twisted Stitch Stretchy Bind Off

1. Knit the first stitch.


2. If the next stitch is a KNIT stitch, knit the second stitch through the back look (k tbl).  If the next stitch is a PURL stitch, purl the next stitch through the back loop (p tbl).

IMG_3366

3. Slip the first stitch on the right hand needle over the second stitch (like you would with a regular bind off), so you are left with a single stitch on the needle.

IMG_3365


IMG_3363


4.  Continue steps 2 and 3 until you are left with one stitch.  Break yarn and pull through the last stitch.


IMG_3372 (2)


Designing a Pattern

If you’ve followed my blog, you know that I had a baby in April and I finished the adult sweater for myself soon after.  It’s been almost two months since my last post, but it has been a BUSY two months.  I have a new baby who needs constant attention during the day, three additional boys (all finished with school for the summer), and a husband who was out of the country for part of the time.  To top it all off, I had surgery and spent some time recovering while family helped with the kids.

Nevertheless, hardly a day has gone by that I haven’t picked up my knitting.  In fact, I’ve been working on my largest knitting project to date… designing a pattern that will be tested, edited, and ultimately sold through ravelry.  If all goes well, it should be up by the beginning of August!  This post is to tell a little about my process.

DSC_0048


Before I finished my Right as Rainbow Sweater, I started looking for my next project.  As any mom of young boys knows, sweater vests are one of the most popular dress items.  Hardly a Christmas or Easter goes by that I don’t spend money on sweater vests for my boys.  This seemed like a relatively easy thing to knit, so I started searching the patterns on ravelry.  Unfortunately, the selection I found was somewhat lacking, particularly when I narrowed the fields to children’s sizes and unisex/boys.  There was a selection of vests that came from a publication but were not available for purchase online.  There were a few sloppy looking vests with uneven proportions and armhole ribbing that stuck out from the sweater.  There were girly looking vests.  There were a couple of halfway decent patterns, but there was only one I would even consider buying, and it wasn’t even sized to fit all my boys.  (I’m a sucker for matching/coordinating outfits!)

I was shocked.  How could a clothing item that is so popular in the stores and so (seemingly) easy to knit be so lacking in patterns?  Searches for “socks” or “hats” or “cardigans” give hundreds, if not thousands of results when the field is narrowed to children. My mission became clear– to knit a sweater vest that would look good and allow me to create coordinated looks for all my boys.

DSC_0055

I thought a lot about how to knit exactly what I wanted.  I knew I wanted to incorporate stripes and I knew I wanted it knit in the round with worsted weight yarn.  Some of the patterns I found knit the vest in several pieces and then seamed them together.  Seaming is my LEAST favorite part of knitting, so I wanted to figure out a way to seam the sweater only at the shoulders.  I scoured the internet for similar patterns and checked out books from the local library.  I made notes about elements I liked in various patterns and thought carefully about how to turn those elements into a vest.  Then I began to knit.

Having purchased a variety of colors of the Cascade Sierra yarn, I knew I wanted to incorporate lots of colors.  While the sweater for myself included various shades of blue and gray, I wanted to use different colors for the boys.  I settled on five colors: Tangerine, Deep Turquoise, Aqua, Moth, and Forest Green.  I used Excel to help visualize the pattern I wanted to create.

I began with Jonathan’s sweater, knitting a size 3T guided by a size chart I found online.  The sweater worked up quickly, but I soon realized that my original pattern was not going to look good as a final product.  I tore the rows apart and went to a more basic ABCDE pattern.

435


I finished the vest (minus the ribbing) in about a week and tried it on Jonathan.  It fit, but just barely.  I became nervous that it would not fit once I completed the neck ribbing.  I wish this instinct was wrong, but unfortunately it was right.  The vest would not go over his head once the neck ribbing was complete.  Luckily I had not yet started the arm hole ribbing.  I decided to keep the top half intact so I could refer back to it and I cut the vest nearly in half along the thin green line of stitches underneath the neck opening. *sigh*

470

This is what goes into designing: lots of trial and error!  I tried again, adding length, more decreases, and using a stretchy bind off.  I was holding my breath as I tried the finished product on my toddler.  It fit!  Not only that, it looked GOOD.  And I had created it.  Completely from scratch and without a pattern.  This was a HUGE moment for me!

DSC_0125

When it comes to crafting, I am a *bit* of a perfectionist.  Okay, I’m just a perfectionist.  And when it comes to putting out a pattern that I’ve created, I want it to be perfect.  Even though I was going to have my pattern tested, I wanted to test it myself and work out all the kinks.  So I made two more versions.  I made a size 6 for my son Adrian and a size 8 for my son Roman.  With each vest, I made little changes to help improve the quality of the pattern.  I used the same colors for all the sweaters, but used them in different band widths and different sequences.  I was surprised and pleased at how different (yet similar) they all turned out.

DSC_0024 (2)

After writing up the pattern, my friend Stephanie helped me photograph the boys in their vests.  We got some great shots and I spent a lot of time editing them and putting together a visually appealing pattern to send out for testing.  I sent the pattern to three different people for proofreading and feedback.  Last night I posted the pattern on ravelry to get testers.  I have two testers that have already started and I’m hoping to get 5 more.  I’m so proud of this pattern and proud that I was able to knit such stylish looks for my boys.  It is frustrating to me that so many of the adorable knitting patterns available are only for girls, so I am excited to contribute one for the boys.  Of course, this pattern would also look adorable on a girl.  I will list it as a unisex pattern, but I’m keeping my title: Band of Brothers Sweater Vest.

DSC_0077 (2)

417One of my main goals for learning to knit was to create a sweater for myself.  Because I am so tall, it is very hard for me to find sweaters with sleeves that are long enough.  By knitting my own sweater, I could add my own length to the sleeves.  My good friend (and knitting inspiration) Stephanie shared her enormously successful Right as Rainbow sweater pattern with me around the beginning of March.  I read through the pattern and loved her clear explanations, detailed photographs, and interesting design.

I talked to Stephanie about the pattern and her yarn recommendations.  I love the softness of cotton, but it does not return to its original shape as easily as wool and gets stretched out over time.  Thus, I decided to look for a wool/cotton blend. Although this is a FANTASTIC pattern, it does require many colors of yarn.  This is great for those who have a huge stash of leftover colors, but my stash to this point has been mainly acrylic and cotton yarns (both washable and great for children).  I needed to find an affordable yarn that would still knit into a beautiful sweater for myself.

015

While searching through the local yarn store and various online yarn suppliers, I happened to find Cascade Sierra– a wool/cotton blend with vibrant colors that had been discontinued and was on clearance.  I ordered a bunch of colors in shades of blue and green so that I could choose among them when they arrived and save the additional yarn for future projects.  I ordered seven skeins of the color “Moth” to make up the bulk of the sweater.  Once I began working with the yarn, I loved it so much that I went and ordered a wider selection of colors to have on hand for future knitting.

014

I bought some long (47″) size 6 circular Addi knitting needles at the local yarn store.  Although the pattern began with the sleeves, I was determined to work on the body first.  Since I was 8 months pregnant, I figured I could always work on the sleeves while I was at the hospital.  As it turned out, by the time I went into labor I was already finished with the main part of the body and both sleeves. The pattern called for one single row of color on the cuff of the sleeves, but I was so tired of knitting gray by that point that I decided to add some additional color to the cuff of the sleeves.  I am so happy with the way they turned out!

077

The most exciting part about knitting this sweater was beginning the rainbow yoke.  This is the top part of the sweater which connects the sleeves and changes colors every 10 rows.  By the time I was ready to have my labor induced, I was on the second color of the rainbow yoke.  I brought the sweater-in-progress and all the colors for the rainbow yoke with me to the hospital and worked on it as much as I could!  Each shift change in nurses brought lots of interest to the project I was creating as they came to check my vital signs and check in on the baby.

093

 About a week after my son Christian was born, I finished the sweater.  I created it for the size I expect to be in the fall, so it is not quite a perfect fit (keep in mind I’m a week postpartum in the following pics!).  The sleeves are as long as I wanted, which makes me very happy.  I absolutely love all the blues and greens and have several shirts in my wardrobe that match it well.  I wore the sweater out for our first “date night” to celebrate my husband’s birthday (Christian came with us, but the other three stayed with Grandma).  I look forward to cool evenings in the fall where I can wear my sweater more frequently!

        411

For more information on Stephanie’s latest patterns (she just released a new collection!) check out TellybeanKnits.  You can also shop her ravelry store with the same name.

Welcome Baby Christian!


At 4:41 pm on April 14, 2014, we welcomed baby Christian Joseph Ross into our family!  He was 8 lbs. 8oz. and 20 inches long.  His older brothers Roman, Adrian, and Jonathan came to see him when he was just a few hours old and were so happy to have a new member of the family!

 IMG_2473[1]

As with my other deliveries, I had to be induced.  This gave me time to knit while the pitocin gradually did its work.  I had been working on a sweater for myself for the past several weeks and relished the opportunity to have some kid-free time to work (despite the contractions)!

095

Since this blog has had a heavy focus on knitting, I decided to share some of my favorite pics of my new little one wearing his homemade apparel:

108160
Wearing his new hat, just after he was born and spending time with Daddy the next day

206 214

Dressed to go home in the hat and socks I designed, worn with the first sweater I ever knit.  Christian got to spend some time with Grammy in his new outfit.

381

Christian wearing the knit pixie hat I made for Michelle Rodgers photography during his newborn photo shoot

Of course, I literally have hundreds of pictures of him already.  I decided to narrow it down to just a few that showed some of his new knitwear.  Now I’m working on some coordinating sweaters for my entire crew of boys!